Since i've been finding Wordpress much easier to use along with Windows Live Writer - I'm moving my blog there from now on.
Same dismal title:
http://SharePointMakesMeCry.wordpress.com
Cheers!
davros.
Wednesday, 26 August 2009
Wednesday, 1 July 2009
InfoPath Custom Save Action: Save as Draft and Avoid Validation
Recently i’ve been working on a project that has required a user to be able to save a form to SharePoint as they are working on it, a kind of draft. The only way to do this is to allow the user to use the standard ‘Save’ function on the toolbar (in IP client or browser). This offers the user the option to choose a filename – fine if there’s going to be 10 forms in the library, but if there are 000’s then users are going to be overwriting each other’s work.
First step was to set up a Submit Data Connection to the SharePoint library. This is good because I can generate a unique filename and post the document there. However, since the connection is a ‘Submit’, the form will not allow you to run it until all validation errors are cleared… no good for draft forms.
Next step was to jump into code behind - clear the validation errors in the collection, then submit the form:
This works fine, BUT – if the user wants to save a draft and continue working, all the validation has been basically disabled in the form until it is reloaded. SO: final solution was to manually write the xml file into the forms library. This was actually less hairy than it sounds. It consists of 2 methods in code behind – 1 to process a HTTP PUT command, and one to basically call it. The web request method is pretty generic: url: The full URL of the file (http://sharepoint/forms/myform123.xml)
header: The header information in an infopath file (the xml declaration and processing instructions). The method takes the header, selects the form data from the root node (in this case /my:Application), and builds a string before pushing that through the web request.
The following method just sets up the header (copied from a locally saved infopath form), and calls the web request method. Note: for a filename, I am using a field in my form called ‘GUID’, so I just select that from the form and build my url string with it.
(In production, you’d also want to call the GetListItems webservice to ensure it was saved correctly)
So, after being tied up to whichever event you choose (i’m saving in the background as the user fills out the form) this should quietly dump the xml file into a library. For some reason the library doesn’t recognise the xml as being an InfoPath file, so to open the form again you’ll need to send the user to the FormServer.aspx?xmllocation=http://sharepoint/forms/123456.xml page, and it will work fine.
If you publish the form as administrator approved, and apply the content type to the library you’re saving into, it will automatically populate the promoted properties as it saves. Lucky, eh…
Hopefully this makes sense – I searched for a neater way of doing this for ages, but i’ve found this approach to be the most manageable.
.davros.
First step was to set up a Submit Data Connection to the SharePoint library. This is good because I can generate a unique filename and post the document there. However, since the connection is a ‘Submit’, the form will not allow you to run it until all validation errors are cleared… no good for draft forms.
Next step was to jump into code behind - clear the validation errors in the collection, then submit the form:
| this.Errors.DeleteAll(); this.Submit(); |
header: The header information in an infopath file (the xml declaration and processing instructions). The method takes the header, selects the form data from the root node (in this case /my:Application), and builds a string before pushing that through the web request.
The following method just sets up the header (copied from a locally saved infopath form), and calls the web request method. Note: for a filename, I am using a field in my form called ‘GUID’, so I just select that from the form and build my url string with it.
(In production, you’d also want to call the GetListItems webservice to ensure it was saved correctly)
So, after being tied up to whichever event you choose (i’m saving in the background as the user fills out the form) this should quietly dump the xml file into a library. For some reason the library doesn’t recognise the xml as being an InfoPath file, so to open the form again you’ll need to send the user to the FormServer.aspx?xmllocation=http://sharepoint/forms/123456.xml page, and it will work fine.
If you publish the form as administrator approved, and apply the content type to the library you’re saving into, it will automatically populate the promoted properties as it saves. Lucky, eh…
Hopefully this makes sense – I searched for a neater way of doing this for ages, but i’ve found this approach to be the most manageable.
.davros.
Wednesday, 25 March 2009
Visio Diagrams in SharePoint
I've recently been working on a project for a customer who wanted to base their system around Visio process diagrams. We found a neat way of using standard Visio and SharePoint functionality to make this work for them - allowing them to build a system based on interactive diagrams.
System Structure:
The system is based on one process diagram per site. Of course you could use multiple ones per site - but this approach was simpler to manage. Since the processes could relate to multiple departments, and were to categorised in various ways, we decided to opt for creating them all at the same level, directly under a site directory.
Multiple higher level processes could relate to a single sub-process, so this flat structure allowed greater flexibility - and processes were to be connected by manual hyperlinks in the diagrams.
Step 1: Create a SharePoint site.
Note: For our client, I created a custom site definition for them to use. This was to enable me to set the default layout of the home page, as well as activate the publishing feature so they could create publishing pages alongside the processes.
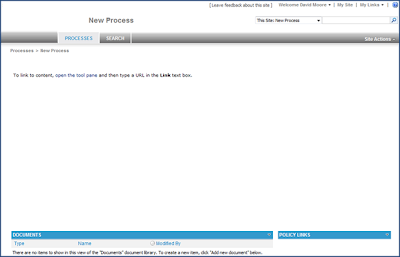
My site just contained a document library, and a large page viewer on the home page:
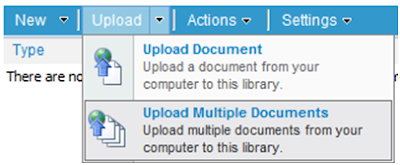
Step 2: Upload any supporting documents to the document library.
If your diagram refers to supporting documents, the library in the process site is a good place to store them.
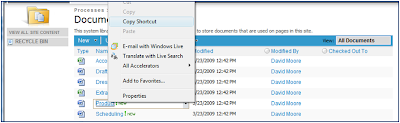
Step 3: Link your Visio diagram to your supporting documents
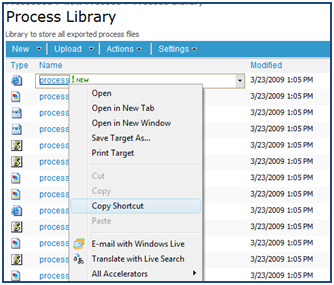
Copying the URL's of the documents you've uploaded, you can create hyplerlinks from your Visio objects to them - meaning when a user click on the object, the supporting document will open up:
Copy the URL of the doc:
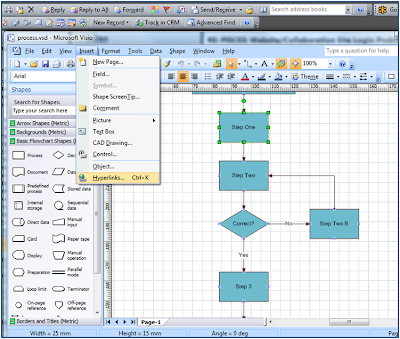
Create hyperlink in Visio. To connect 2 process sites together - you can just create hyperlinks here to another process site.
Step 4: Export our Diagram from Visio
In Visio, go File -> save as web page
Select a location for the exported files (there will be about 30 of them)
Click 'Publish'. This will allow you to select the features you want to use on your diagram. A highly useful one is 'Pan and Zoom', which helps to cater for larger diagrams.
Make sure you have unticked the box which says "organise into folders". You want to export all the files into a single folder, to help uploading to SharePoint.
Step 5: Upload and display in SharePoint
Create another document library in your process site, and upload the exported files:
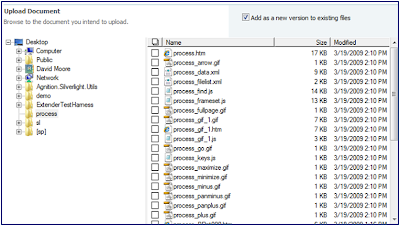
Next - copy the URL of the main exported htm file (at the top - named after the process)
Now, just plug that URL into a page viewer on your home page. PRESTO - you should have a SharePoint site dedicated to serving an interactive Visio diagram.

This can be a really neat way of consolidating your process diagrams using SharePoint.
.davros.
Tuesday, 24 February 2009
User-Centric Themes: SharePoint Branding: Part 2
Loading Different Themes Per User
In my last post I talked about audience targeted branding - using a Content Query Web Part to pull in different CSS sheets depending on which audience the user was in.
That works nicely, and being able to use audiences to gather users together is handy - but it doesn't allow you to brand the application pages and form pages. For that you need to use a theme - and you can't change the theme per user, it's set once per site.
SO - I've come up with a neat trick to allow us to use a theme, but display a different CSS sheet to different sets of users.
General Concepts
Essentially, we're going to use the same method as seen before - creating a custom theme on the server which references a single stylesheet deployed elsewhere (so when the theme is applied, it only links to the existing style sheet so changes to the 1 style sheet are applied globally). I have blogged this before: (http://sharepointmakesmecry.blogspot.com/2008/11/creating-global-theme-using-single-css.html)
Now we're going to extend this idea to include multiple global style sheets - and load individual ones depending on the user logged in. This can be hugely powerful and will allow for entirely different user experiences from user to user.
Steps
1. Create our CSS files. You are best to start by copying the CSS from an existing SP theme, like Simple, and then making your changes from there. We will create a number of CSS files:
a) A 'Common' one - This will be used to define any styles that are shared between all users.
b) 'Group 1 Style' - Bare CSS, and only re-defines the individual styles for group 1.
c) 'Group 2 Style' - Re-defines the style for group 2.
d) 'Group...N style' - One CSS per individual group.
2. Upload all the CSS sheets to a common document library. This should be a Document Library somewhere in the system which is accessible by all users. Make the library readable by all.
3. Create SharePoint groups in the same site to divide the users.
4. Individually permission the CSS sheets off to SharePoint groups, so only members of 'Group 1' can read Group1.css, and so on.
5. Create our theme CSS file to be deployed on the server. All this file will do is list all the CSS files in the document library, and import them all at runtime:
eg.
@import:url('/doclibrary/common.css');
@import:url('/doclibrary/group1.css');
@import:url('/doclibrary/group2.css');
.....
@import:url('/doclibrary/groupN.css');
6. Deploy and apply the theme. Now when you log in all the theme files will be referenced, but most of them will be denied - leaving only the ones you have permission to read. So as you log in as users from the different SharePoint groups then you should see different CSS files loaded.
Hopefully you can see how powerful this could be!
.davros.
Tuesday, 27 January 2009
SharePoint: Audience Targeted Branding
A while ago I had an interesting requirement: to brand a SharePoint system in such a way that different users logging in to the same sites are served with different branding experiences. I have finally gotten around to blogging the trick I used...
[Note: This article assumes you are already competant with the theory of branding SharePoint. If not I suggest you look at Heather Solomon's blog - she's a branding guru]
The customer was fortunately using MOSS, so I settled on the idea of Audience Targeted Branding.
Audiences
Audiences in MOSS are built by collecting together groups of users based on their Profile Properties. This may be based on location / company / domain / department ....? Content in lists and libraries can then be 'targeted' to these users - so the same page can be seen by 2 different users and each will see content relevant to them.
Great - but how do we extend this to include their branding experience?
Branding
The Branding I am referring to is performed using CSS. Since the master page is set once per site - this cannot be changed for each user - (you'd need to start looking into variations for that).
The basic idea is to load a different Style Sheet to the browser for each audience. This is actually easier than it sounds.
Example
Say I want the users logging in from 1 location to see all the links in red, and other users to see all the links in green. I am using a MOSS site with the publishing feature activated. I follow this process:
1. Build the 2 audiences (in shared service admin), based on the location property in the user profile.
2. Create a general.css stylesheet that will the default one for the site. This will hold the majority of the CSS, including any branding that is shared by the users (ie. All Titles are Bold for everyone). Apply this CSS as the 'Alternate CSS' in the Master Page settings in the MOSS site.
3. Create a location1.css - the CSS file to be loaded on top of the default one when a user from location 1 logs in. In our example this will have the single command to turn hyplerlinks red.
4. Create a location2.css - same principle as step 3.
5. Create a custom list, and call it StyleSheets. Enable Audience targeting for the list. We will enter 2 items - each one being an HTML element importing the appropriate style sheet.
eg:
<link rel='stylesheet' type='text/css' href='/Style Library/location1.css'>
<link rel='stylesheet' type='text/css' href='/Style Library/location2.css'>
6. Target each item to the appropriate audience.
7. Now, open the page layout of the site in SPD. Insert a Content Query Web Part (not in a zone), and select to display the StyleSheet list, and tick 'Apply Audience Filtering' under the query options. Save and view the page.
8. Now - when you log in as the 2 different users, you should see a different list item being displayed by the CQWP. All that's left is to force those list items to be rendered as html in the page, rather than being displayed as text.
9. Open ItemStyle.xsl under the Style Library/XSL Style Sheets.
10. Paste the following template at the end just before the element.
<xsl:template name="HTMLInsert" match="Row[@Style='HTMLInsert']" mode="itemstyle">
<xsl:variable name="SafeLinkUrl">
<xsl:call-template name="OuterTemplate.GetSafeLink">
<xsl:with-param name="UrlColumnName" select="'LinkUrl'"/>
</xsl:call-template>
</xsl:variable>
<xsl:variable name="SafeImageUrl">
<xsl:call-template name="OuterTemplate.GetSafeStaticUrl">
<xsl:with-param name="UrlColumnName" select="'ImageUrl'"/>
</xsl:call-template>
</xsl:variable>
<xsl:variable name="DisplayTitle">
<xsl:call-template name="OuterTemplate.GetTitle">
<xsl:with-param name="Title" select="@Title"/>
<xsl:with-param name="UrlColumnName" select="'LinkUrl'"/>
</xsl:call-template>
</xsl:variable>
<xsl:variable name="LinkTarget">
<xsl:if test="@OpenInNewWindow = 'True'" >_blank</xsl:if>
</xsl:variable>
<xsl:call-template name="OuterTemplate.CallPresenceStatusIconTemplate"/>
<xsl:value-of select="$DisplayTitle" disable-output-escaping="yes"/>
</xsl:template>
Save as a major version, and open the web part properties of the CQWP again.
11. Go down to 'Presentation' and select 'HTMLInsert' as the template to use.
PRESTO.
Now the html elements in our targeted list should be inserted into the page at runtime as valid HTML - so the browser will actually call a different style sheet for each user.
Further Application
Using this method combined with content targeting, as well as image targeting (through the CQWP) can allow us to generate very different user experiences for each user.
Hope you can have fun with this!
.davros.
Subscribe to:
Posts (Atom)
